- logstash是什么?
官网的一句话:logstash是免费且开放的服务器端数据处理管道,能够从多个来源采集数据,转换数据,然后将数据发送到您喜欢的”存储库”中,这个存储库通常是es.
- logstash的作用是?
Logstash 能够动态地采集,转换和传输数据,不受格式或复杂度的影响。说白了,就是可以采集数据,过滤数据,并输出的这样一个工具。
- 既然logstash和filebeat都有数据采集功能,那为什么通常的数据链路是:filebeat->logstash->(kafaka)->es,为什么不直接去掉filebeat这一层,直接用logstash收集加过滤处理?
这就要说到elk的一些历史:
因为logstash是jvm跑的,资源消耗比较大,所以后来作者又用golang写了一个功能较少但是资源消耗也小的轻量级的logstash-forwarder。
不过作者只是一个人,加入http://elastic.co公司以后,因为es公司本身还收购了另一个开源项目packetbeat,而这个项目专门就是用golang的,有整个团队,所以es公司干脆把logstash-forwarder的开发工作也合并到同一个golang团队来搞,于是新的项目就叫filebeat了。
究其原因是:性能问题加上项目历史的一些原因。
所以最后一般是filebeat做采集,logstash 做数据处理和过滤
- 说了这么多,我们来安装一下logstash
#检查jdk环境,需要jdk1.8+
java -version

#解压安装包
tar -xvzf logstash-6.2.4.tar.gz- 在聊示例之前,再聊一会儿logstash的理论
A Logstash pipeline has two required elements, input and output, and one optional element, filter. The input plugins consume data from a source, the filter plugins modify the data as you specify, and the output plugins write the data to a destination.
以上是elk 官网的一段logstash介绍,大致意思是说:logstash流水线分两个必需的元素,输入和输出,以及一个可选元素:过滤器,输出组件从源头消费数据,过滤组件按你指定的方式修改数据,输出组件写数据到目标位置

现在我们来看下上面第一个示例:输入是stdin, 输出是标准输出
#第一个logstash示例
bin/logstash -e 'input {stdin {}} output {stdout {}}'
The -e flag enables you to specify a configuration directly from the command line. Specifying configurations at the command line lets you quickly test configurations without having to edit a file between iterations. The pipeline in the example takes input from the standard input, stdin, and moves that input to the standard output, stdout, in a structured format.
上面这段的意思大概是说 -e参数/标识 使得你能够直接从命令行指定配置,通过命令行指定配置能够让你快速测试配置,不用编辑文件,上面的例子是流水线从标准输入接收,然后从标准输出打印输出
[root@VM_IP_centos logstash-6.2.4]# bin/logstash -e 'input {stdin {}} output {stdout {}}'
Sending Logstash's logs to /opt/logstash-6.2.4/logs which is now configured via log4j2.properties
[2020-06-14T11:16:12,913][INFO ][logstash.modules.scaffold] Initializing module {:module_name=>"netflow", :directory=>"/opt/logstash-6.2.4/modules/netflow/configuration"}
[2020-06-14T11:16:12,944][INFO ][logstash.modules.scaffold] Initializing module {:module_name=>"fb_apache", :directory=>"/opt/logstash-6.2.4/modules/fb_apache/configuration"}
[2020-06-14T11:16:13,090][INFO ][logstash.setting.writabledirectory] Creating directory {:setting=>"path.queue", :path=>"/opt/logstash-6.2.4/data/queue"}
[2020-06-14T11:16:13,103][INFO ][logstash.setting.writabledirectory] Creating directory {:setting=>"path.dead_letter_queue", :path=>"/opt/logstash-6.2.4/data/dead_letter_queue"}
[2020-06-14T11:16:13,892][WARN ][logstash.config.source.multilocal] Ignoring the 'pipelines.yml' file because modules or command line options are specified
[2020-06-14T11:16:13,975][INFO ][logstash.agent           ] No persistent UUID file found. Generating new UUID {:uuid=>"a7b8baba-eebb-409c-9aa9-6173a492a1ec", :path=>"/opt/logstash-6.2.4/data/uuid"}
[2020-06-14T11:16:15,028][INFO ][logstash.runner          ] Starting Logstash {"logstash.version"=>"6.2.4"}
[2020-06-14T11:16:15,758][INFO ][logstash.agent           ] Successfully started Logstash API endpoint {:port=>9600}
[2020-06-14T11:16:19,293][INFO ][logstash.pipeline        ] Starting pipeline {:pipeline_id=>"main", "pipeline.workers"=>1, "pipeline.batch.size"=>125, "pipeline.batch.delay"=>50}
[2020-06-14T11:16:19,514][INFO ][logstash.pipeline        ] Pipeline started successfully {:pipeline_id=>"main", :thread=>"#<Thread:0x6dbc2611 run>"}
The stdin plugin is now waiting for input:
[2020-06-14T11:16:19,722][INFO ][logstash.agent           ] Pipelines running {:count=>1, :pipelines=>["main"]}
hello world
{
          "host" => "VM_16_5_centos",
    "@timestamp" => 2020-06-14T03:23:11.693Z,
      "@version" => "1",
       "message" => "hello world"
}- 配置一个简单的logstash, 输入是标准输入stdin, 输出是es
input { stdin { } }
output {
  elasticsearch { hosts => ["localhost:9200"] }
  stdout { codec => rubydebug }
}
bin/logstash -f logstash-simple.confWhen you run logstash, you use the -f to specify your config file. (用f参数来指定logstash的配置文件),接下来我们来测试一下:
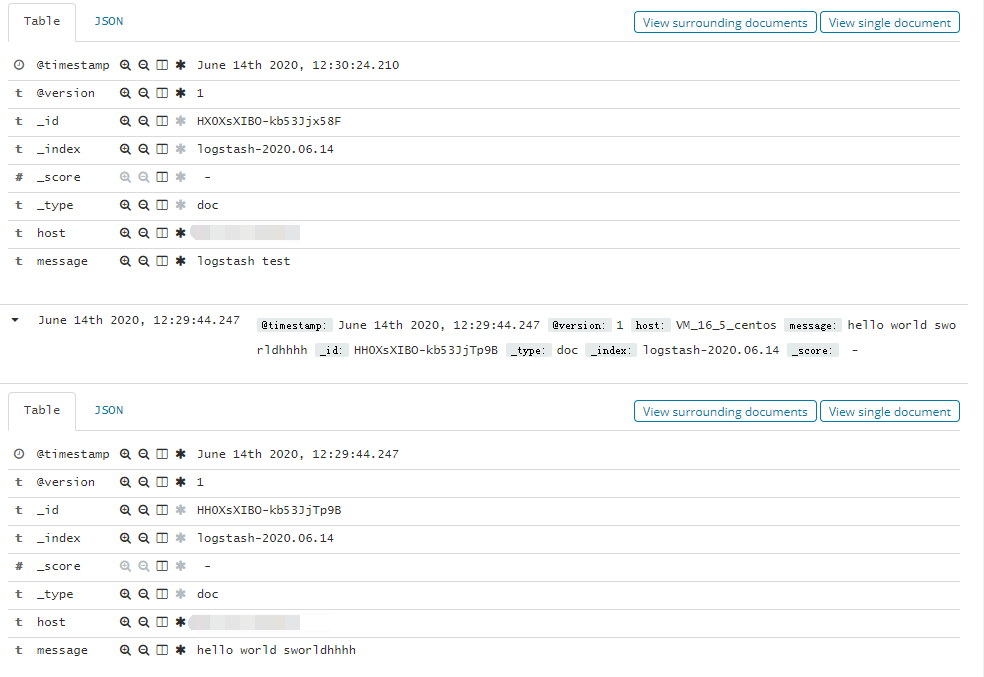
hhhh
{
    "@timestamp" => 2020-06-14T04:29:44.247Z,
      "@version" => "1",
          "host" => "VM_IP_centos",
       "message" => "hello world sworldhhhh"
}
logstash test
{
    "@timestamp" => 2020-06-14T04:30:24.210Z,
      "@version" => "1",
          "host" => "VM_IP_centos",
       "message" => "logstash test"
}
我在命令行终端输入两次,一次“hello world sworldhhhh”, 一次“logstash test”
A Logstash config file has a separate section for each type of plugin you want to add to the event processing pipeline. For example:
# This is a comment. You should use comments to describe
# parts of your configuration.
input {
  ...
}

filter {
  ...
}

output {
  ...
}- 接下来我们将读取从标准输入换成从文件读取
Logstash 使用一个名叫 FileWatch 的 Ruby Gem 库来监听文件变化。这个库支持 glob 展开文件路径,而且会记录一个叫 .sincedb 的数据库文件来跟踪被监听的日志文件的当前读取位置。所以,不要担心 logstash 会漏过你的数据。
input
    file {
        path => ["/var/log/*.log", "/var/log/message"]
        type => "system"
        start_position => "beginning"
    }
}
input负责从数据源提取数据,由于我提取的是日志文件,所以使用的是file插件,该插件常用的几个参数是:
path:指定日志文件路径。
type:指定一个自定义名称,设置type后,可以在后面的filter和output中对不同的type做不同的处理,适用于需要消费多个日志文件的场景。
start_position:指定起始读取位置,“beginning”表示第一次启动从文件头开始读取,后面动态读取;“end”表示从文件尾开始(类似tail -f)。
sincedb_path:sincedb_path 指定sincedb文件的路径。sincedb保存每个日志文件已经被读取到的位置,如果Logstash重启,对于同一个文件,会继续从上次记录的位置开始读取。如果想重新从头读取文件,需要删除sincedb文件。如果设置为“/dev/null”,即不保存位置信息。