Amoeba for mysql浅谈

最近在做数据库实例切换,接触到amoeba,于是稍加学习了一下,先介绍一下,什么是Amoeba?

Amoeba一共有三个项目产品:

Amoeba for MySQL:

为MySQL提供了一种数据库代理的解决方案,可以实现多台MySQL之间的读写分离,具有负载均衡、高可用性、Query过滤、读写分离、可路由相关的query到目标数据库、可并发请求多台数据库合并结果。 在Amoeba上面你能够完成多数据源的高可用、负载均衡、数据切片的功能。

Amoeba for Aladdin:

类似“Amoeba for MySQL”,不同的是“Amoeba for MySQL”只支持MySQL数据库,“Amoeba for Aladdin”支持多种数据库,同时还可以在后台使用多种混合数据库。

Amoeba for MongoDB:

实现对NoSQL数据库MongoDB的代理功能,具备心跳检测、负载均衡、故障转移、查询聚合等功能。

从目前Amoeba的系列产品来看,都是针对数据库存储应用在分布式群集负载场景下的解决方案,覆盖了常用的数据库种类。

Amoeba(变形虫)项目,该开源框架于2008年 开始发布一款 Amoeba for Mysql软件。 着重介绍下Amoeba for mysql, 这个软件致力于MySQL的分布式数据库前端代理层,它主要在应用层访问MySQL的时候充当SQL路由功能,专注于分布式数据库代理层(Database Proxy)开发。座落与 Client、DB Server(s)之间,对客户端透明。具有负载均衡、高可用性、SQL 过滤、读写分离、可路由相关的到目标数据库、可并发请求多台数据库合并结果。 通过Amoeba你能够完成多数据源的高可用、负载均衡、数据切片的功能,目前Amoeba已在很多 企业的生产线上面使用。

从上面这段话可以看出:Amoeba for mysql 主要是mysql的一个代理,主要是应用层访问mysql时充当sql路由。

大致查了一下,amoeba大概从2012年下旬之后,就不再更新了,是一个非常老的开源项目,并且资料比较少,出于现有项目有使用到这个代理,只能硬着头皮啃了.

  • Amoeba安装

详见这篇文档:http://wiki.hexnova.com/pages/viewpage.action?pageId=2031909

  1. 安装Java, Amoeba框架是基于Java SE1.6开发的,建议使用Java SE 1.6版本。java -version
    java version “1.6.0_18”
  2. http://sourceforge.net/projects/amoeba/files/ Amoeba源码下载
  3. 下载后存放并解压到安装的位置。这里假设你将存档文件解压到/usr/local/amoeba-mysql-binary-2.0.1-BETA,解压到其他路径也是一样的。进入Ameoba运行目录:[]$ cd AMOEBA_HOME=/usr/local/amoeba-mysql-binary-2.0.1-BETA/bin
  4. 验证: amoeba start|stop
  • Amoeba 基础入门

详细参考:http://wiki.hexnova.com/pages/viewpage.action?pageId=2031911

Amoeba基础配置介绍

Amoeba有哪些主要的配置文件?

  • 想象Amoeba作为数据库代理层,它一定会和很多数据库保持通信,因此它必须知道由它代理的数据库如何连接,比如最基础的:主机IP、端口、Amoeba使用的用户名和密码等等。这些信息存储在$AMOEBA_HOME/conf/dbServers.xml中。
  • Amoeba为了完成数据切分提供了完善的切分规则配置,为了了解如何分片数据、如何将数据库返回的数据整合,它必须知道切分规则。与切分规则相关的信息存储在$AMOEBA_HOME/conf/rule.xml中。
  • 当我们书写SQL来操作数据库的时候,常常会用到很多不同的数据库函数,比如:UNIX_TIMESTAMP()、SYSDATE()等等。这些函数如何被Amoeba解析呢?$AMOEBA_HOME/conf/functionMap.xml描述了函数名和函数处理的关系。
  • 对$AMOEBA_HOME/conf/rule.xml进行配置时,会用到一些我们自己定义的函数,比如我们需要对用户ID求HASH值来切分数据,这些函数在$AMOEBA_HOME/conf/ruleFunctionMap.xml中定义。
  • Amoeba可以制定一些可访问以及拒绝访问的主机IP地址,这部分配置在$AMOEBA_HOME/conf/access_list.conf中
  • Amoeba允许用户配置输出日志级别以及方式,配置方法使用log4j的文件格式,文件是$AMOEBA_HOME/conf/log4j.xml。

配置一个db节点, 使用Amoeba做操作转发的步骤:

1. 首先,在$AMOEBA_HOME/conf/dbServers.xml中配置一台数据库,如下:

<?xml version="1.0" encoding="gbk"?>

<!DOCTYPE amoeba:dbServers SYSTEM "dbserver.dtd">
<amoeba:dbServers xmlns:amoeba="http://amoeba.meidusa.com/">

  <!--
   Each dbServer needs to be configured into a Pool,
   If you need to configure multiple dbServer with load balancing that can be simplified by the following configuration:
    add attribute with name virtual = "true" in dbServer, but the configuration does not allow the element with name factoryConfig
    such as 'multiPool' dbServer
  -->

 <dbServer name="abstractServer" abstractive="true">
  <factoryConfig class="com.meidusa.amoeba.mysql.net.MysqlServerConnectionFactory">
   <property name="manager">${defaultManager}</property>
   <property name="sendBufferSize">64</property>
   <property name="receiveBufferSize">128</property>

   <!-- mysql port -->
   <property name="port">3306</property>

   <!-- mysql schema -->
   <property name="schema">test</property>

   <!-- mysql user -->
   <property name="user">root</property>

   <!--  mysql password -->
   <property name="password">password</property>

  </factoryConfig>

  <poolConfig class="com.meidusa.amoeba.net.poolable.PoolableObjectPool">
   <property name="maxActive">500</property>
   <property name="maxIdle">500</property>
   <property name="minIdle">10</property>
   <property name="minEvictableIdleTimeMillis">600000</property>
   <property name="timeBetweenEvictionRunsMillis">600000</property>
   <property name="testOnBorrow">true</property>
   <property name="testWhileIdle">true</property>
  </poolConfig>
 </dbServer>

 <dbServer name="server1"  parent="abstractServer">
  <factoryConfig>
   <!-- mysql ip -->
   <property name="ipAddress">127.0.0.1</property>
  </factoryConfig>
 </dbServer>

 <dbServer name="multiPool" virtual="true">
  <poolConfig class="com.meidusa.amoeba.server.MultipleServerPool">
   <!-- Load balancing strategy: 1=ROUNDROBIN , 2=WEIGHTBASED , 3=HA-->
   <property name="loadbalance">1</property>

   <!-- Separated by commas,such as: server1,server2,server1 -->
   <property name="poolNames">server1</property>
  </poolConfig>
 </dbServer>

</amoeba:dbServers>

以下对这个简单的配置文件进行一些分析:
这份dbServers配置文件中,我们定义了三个dbServer元素,这是第一个dbServer元素的定义。这个名为abstractServer的dbServer,其abstractive属性为true,这意味着这是一个抽象的dbServer定义,可以由其他dbServer定义拓展。
在第一个dbServer元素分别定义MySQL的端口号、数据库名、用户名以及密码。
manager定义了该dbServer选择的连接管理器(ConnectionManager),这里引用了amoeba.xml的配置,稍后介绍。
dbServer下有poolConfig的元素,这个元素的属性主要配置了与数据库的连接池,与此相关的具体配置会在后面的章节中详细介绍。
命名为server1的dbServer元素,正如你设想的那样,这个server1是abstractServer的拓展,parent属性配置了拓展的抽象dbServer,它拓展了abstractServer的ipAddress属性来指名数据库的IP地址,而在端口、用户名密码、连接池配置等属性沿用了abstractServer的配置。
server1拓展了abstractServer的ipAddress属性。
这一段其实并不需要配置,并不会影响到基本使用。以下大致介绍下此配置的含义:multiPool是一个虚拟的数据库节点,可以将这个节点配置成好几台数据库组成的数据库池。比如上面这个配置中仅配置了一台server1,负载均衡策略为ROUNDROBIN(轮询)。与虚拟数据库节点相关的详细教程会在后面的章节中介绍。
由此,你大概可以理解定义abstractServer的原因:当我们有一个数据库集群需要管理,这个数据库集群中节点的大部分信息可能是相同的,比如:端口号、用户名、密码等等。因此通过归纳这些共性定义出的abstractServer极大地简化了dbServers配置文件

2.配置amoeba.xml

<?xml version="1.0" encoding="gbk"?>

<!DOCTYPE amoeba:configuration SYSTEM "amoeba.dtd">
<amoeba:configuration xmlns:amoeba="http://amoeba.meidusa.com/">
        <proxy>
                <!-- service class must implements com.meidusa.amoeba.service.Service -->
                <service name="Amoeba for Mysql" class="com.meidusa.amoeba.net.ServerableConnectionManager">
                        <!-- amoeba对外连接数据库时的端口 -->
                        <property name="port">8066</property>
                        <!-- amoeba对外连接数据库时的IP -->
                        <property name="ipAddress">127.0.0.1</property>
                        <property name="manager">${clientConnectioneManager}</property>
                        <property name="connectionFactory">
                                <bean class="com.meidusa.amoeba.mysql.net.MysqlClientConnectionFactory">
                                        <property name="sendBufferSize">128</property>
                                        <property name="receiveBufferSize">64</property>
                                </bean>
                        </property>
                        <property name="authenticator">
                                <bean class="com.meidusa.amoeba.mysql.server.MysqlClientAuthenticator">
										<!-- amoeba对外连接数据库时的用户名 -->
                                        <property name="user">root</property>
										<!-- amoeba对外连接数据库时的密码 -->
                                        <property name="password"></property>
                                        <property name="filter">
                                                <bean class="com.meidusa.amoeba.server.IPAccessController">
                                                        <property name="ipFile">${amoeba.home}/conf/access_list.conf</property>
                                                </bean>
                                        </property>
                                </bean>
                        </property>

                </service>
                <!-- server class must implements com.meidusa.amoeba.service.Service -->
                <service name="Amoeba Monitor Server" class="com.meidusa.amoeba.monitor.MonitorServer">
                        <!-- port -->
                        <!--  default value: random number
                        <property name="port">9066</property>
                        -->
                        <!-- bind ipAddress -->
                        <property name="ipAddress">127.0.0.1</property>
                        <property name="daemon">true</property>
                        <property name="manager">${clientConnectioneManager}</property>
                        <property name="connectionFactory">
                                <bean class="com.meidusa.amoeba.monitor.net.MonitorClientConnectionFactory"></bean>
                        </property>

                </service>
                <runtime class="com.meidusa.amoeba.mysql.context.MysqlRuntimeContext">
                        <!-- proxy server net IO Read thread size -->
                        <property name="readThreadPoolSize">20</property>
                        <!-- proxy server client process thread size -->
                        <property name="clientSideThreadPoolSize">30</property>
                        <!-- mysql server data packet process thread size -->
                        <property name="serverSideThreadPoolSize">30</property>
                        <!-- per connection cache prepared statement size  -->
                        <property name="statementCacheSize">500</property>
                        <!-- query timeout( default: 60 second , TimeUnit:second) -->
                        <property name="queryTimeout">60</property>
                </runtime>

        </proxy>
        <!-- 
                Each ConnectionManager will start as thread
                manager responsible for the Connection IO read , Death Detection
        -->
        <connectionManagerList>
                <connectionManager name="clientConnectioneManager" class="com.meidusa.amoeba.net.MultiConnectionManagerWrapper">
                        <property name="subManagerClassName">com.meidusa.amoeba.net.ConnectionManager</property>
                        <!-- 
                          default value is avaliable Processors 
                        <property name="processors">5</property>
                         -->
                </connectionManager>
                <connectionManager name="defaultManager" class="com.meidusa.amoeba.net.MultiConnectionManagerWrapper">
                        <property name="subManagerClassName">com.meidusa.amoeba.net.AuthingableConnectionManager</property>

                        <!-- 
                          default value is avaliable Processors 
                        <property name="processors">5</property>
                         -->
                </connectionManager>
        </connectionManagerList>
        <!-- default using file loader -->
        <dbServerLoader class="com.meidusa.amoeba.context.DBServerConfigFileLoader">
                <property name="configFile">${amoeba.home}/conf/dbServers.xml</property>
        </dbServerLoader>

        <queryRouter class="com.meidusa.amoeba.mysql.parser.MysqlQueryRouter">
                <property name="ruleLoader">
                        <bean class="com.meidusa.amoeba.route.TableRuleFileLoader">
                                <property name="ruleFile">${amoeba.home}/conf/rule.xml</property>
                                <property name="functionFile">${amoeba.home}/conf/ruleFunctionMap.xml</property>
                        </bean>
                </property>
                <property name="sqlFunctionFile">${amoeba.home}/conf/functionMap.xml</property>
                <property name="LRUMapSize">1500</property>
                <!--amoeba默认连接的server-->
                <property name="defaultPool">master</property>
                <!--允许在master上写数据-->
         <!--
                <property name="writePool">master</property>
                <!--允许在MultiPool上读数据-->
                <property name="readPool">MultiPool</property>
                -->
                <property name="needParse">true</property>
        </queryRouter>
</amoeba:configuration>

port: amoeba 服务器端口号
user: 登录amoeba的用户名
password: 登录amoeba的密码
defaultPool: 设置默认数据库节点,一般是 master 节点
writePool: 设置只读数据库节点
readPool: 设置只读数据库节点

启动:

sh /data/amoeba/bin/shutdown|start

以上就是Amoeba一些简单的用法和配置,项目仅仅是用amoeba作数据库代理上(为了db安全考虑),没有用到主从和高可用。

主要参考文档: (资料实在是太少太不详尽了

https://www.jianshu.com/p/4aec9f682509
https://juejin.im/entry/596d71126fb9a06bbf70177c
http://wiki.hexnova.com/pages/viewpage.action?pageId=2031911
https://www.biaodianfu.com/amoeba.html
https://blog.51cto.com/tianshili/1640092

elk之kibana 查询使用

通过在搜索栏输入搜索条件,您可以在匹配当前索引模式的索引中进行搜索。您可以进行简单的文本查询,或使用 Lucene 语法,或使用基于 JSON 的 Elasticsearch 查询 DSL。

下面是一些lucene语法的简易查询条件:

  • You can search any field by typing the field name followed by a colon “:” and then the term you are looking for.
title:"The Right Way" AND text:go
title:"Do it right" AND right
  • Wildcard Searches 通配符查找

The single character wildcard search looks for terms that match that with the single character replaced. For example, to search for “text” or “test” you can use the search:

  • where the status field contains active
status:active
  • where the title field contains quick or brown. If you omit the OR operator the default operator will be used
title:(quick OR brown)
title:(quick brown)
  • where the author field contains the exact phrase "john smith"
author:"John Smith"
  • Regular expression patterns can be embedded in the query string by wrapping them in forward-slashes ("/"):
name:/joh?n(ath[oa]n)/
  • Ranges can be specified for date, numeric or string fields. Inclusive ranges are specified with square brackets [min TO max] and exclusive ranges with curly brackets {min TO max}.
count:[1 TO 5]
date:[2012-01-01 TO 2012-12-31]
Dates before 2012
date:{* TO 2012-01-01}
  • 时间范围查询
created:["2020-06-15 22:00:00" TO "2020-06-16 10:00:00"]
GET /index/type/_search
{
  "query": {
    "range": {
      "created": {
        "gte": "2020-06-14 09:00:00",
        "lte": "2020-06-14 10:00:00"
      }
    }
  }
}
  • 编辑距离(莱文斯坦距离):

We can search for terms that are similar to, but not exactly like our search terms, using the “fuzzy” operator:

quikc~ brwn~ foks~

This uses the Damerau-Levenshtein distance to find all terms with a maximum of two changes, where a change is the insertion, deletion or substitution of a single character, or transposition of two adjacent characters.

The default edit distance is 2, but an edit distance of 1 should be sufficient to catch 80% of all human misspellings. It can be specified as:

quikc~1
  • 查询栏大小比较举例
account_number:<100 AND balance:>47500

刷新搜索结果:

  1. 点击 Kibana 工具栏中的 Time Picker  。
  2. 点击 Auto refresh 。
  3. 在列表中选择刷新频率。
自动刷新设置

根据字段过滤

从 Fields 列表中添加一个过滤器:

  • 点击想要过滤的字段名。这里显示了该领域最常用的五个字段值
字段过滤
  • 添加积极过滤器(上图的加号图标),请点击 Positive Filter 按钮 
  • 添加消极过滤器(上图的减号图标),请点击 Negative Filter 按钮

管理过滤器: 修改一个过滤器,请将鼠标置于该过滤器,然后点击某个操作按钮

过滤器

elk之logstash初体验

  • logstash是什么?

官网的一句话:logstash是免费且开放的服务器端数据处理管道,能够从多个来源采集数据,转换数据,然后将数据发送到您喜欢的”存储库”中,这个存储库通常是es.

  • logstash的作用是?

Logstash 能够动态地采集,转换和传输数据,不受格式或复杂度的影响。说白了,就是可以采集数据,过滤数据,并输出的这样一个工具。

  • 既然logstash和filebeat都有数据采集功能,那为什么通常的数据链路是:filebeat->logstash->(kafaka)->es,为什么不直接去掉filebeat这一层,直接用logstash收集加过滤处理?

这就要说到elk的一些历史:
因为logstash是jvm跑的,资源消耗比较大,所以后来作者又用golang写了一个功能较少但是资源消耗也小的轻量级的logstash-forwarder。
不过作者只是一个人,加入http://elastic.co公司以后,因为es公司本身还收购了另一个开源项目packetbeat,而这个项目专门就是用golang的,有整个团队,所以es公司干脆把logstash-forwarder的开发工作也合并到同一个golang团队来搞,于是新的项目就叫filebeat了。
究其原因是:性能问题加上项目历史的一些原因。
所以最后一般是filebeat做采集,logstash 做数据处理和过滤

  • 说了这么多,我们来安装一下logstash
#检查jdk环境,需要jdk1.8+
java -version

#解压安装包
tar -xvzf logstash-6.2.4.tar.gz
  • 在聊示例之前,再聊一会儿logstash的理论

A Logstash pipeline has two required elements, input and output, and one optional element, filter. The input plugins consume data from a source, the filter plugins modify the data as you specify, and the output plugins write the data to a destination.

以上是elk 官网的一段logstash介绍,大致意思是说:logstash流水线分两个必需的元素,输入和输出,以及一个可选元素:过滤器,输出组件从源头消费数据,过滤组件按你指定的方式修改数据,输出组件写数据到目标位置

logstash pipeline

现在我们来看下上面第一个示例:输入是stdin, 输出是标准输出

#第一个logstash示例
bin/logstash -e 'input {stdin {}} output {stdout {}}'

The -e flag enables you to specify a configuration directly from the command line. Specifying configurations at the command line lets you quickly test configurations without having to edit a file between iterations. The pipeline in the example takes input from the standard input, stdin, and moves that input to the standard output, stdout, in a structured format.

上面这段的意思大概是说 -e参数/标识 使得你能够直接从命令行指定配置,通过命令行指定配置能够让你快速测试配置,不用编辑文件,上面的例子是流水线从标准输入接收,然后从标准输出打印输出

[root@VM_IP_centos logstash-6.2.4]# bin/logstash -e 'input {stdin {}} output {stdout {}}'
Sending Logstash's logs to /opt/logstash-6.2.4/logs which is now configured via log4j2.properties
[2020-06-14T11:16:12,913][INFO ][logstash.modules.scaffold] Initializing module {:module_name=>"netflow", :directory=>"/opt/logstash-6.2.4/modules/netflow/configuration"}
[2020-06-14T11:16:12,944][INFO ][logstash.modules.scaffold] Initializing module {:module_name=>"fb_apache", :directory=>"/opt/logstash-6.2.4/modules/fb_apache/configuration"}
[2020-06-14T11:16:13,090][INFO ][logstash.setting.writabledirectory] Creating directory {:setting=>"path.queue", :path=>"/opt/logstash-6.2.4/data/queue"}
[2020-06-14T11:16:13,103][INFO ][logstash.setting.writabledirectory] Creating directory {:setting=>"path.dead_letter_queue", :path=>"/opt/logstash-6.2.4/data/dead_letter_queue"}
[2020-06-14T11:16:13,892][WARN ][logstash.config.source.multilocal] Ignoring the 'pipelines.yml' file because modules or command line options are specified
[2020-06-14T11:16:13,975][INFO ][logstash.agent           ] No persistent UUID file found. Generating new UUID {:uuid=>"a7b8baba-eebb-409c-9aa9-6173a492a1ec", :path=>"/opt/logstash-6.2.4/data/uuid"}
[2020-06-14T11:16:15,028][INFO ][logstash.runner          ] Starting Logstash {"logstash.version"=>"6.2.4"}
[2020-06-14T11:16:15,758][INFO ][logstash.agent           ] Successfully started Logstash API endpoint {:port=>9600}
[2020-06-14T11:16:19,293][INFO ][logstash.pipeline        ] Starting pipeline {:pipeline_id=>"main", "pipeline.workers"=>1, "pipeline.batch.size"=>125, "pipeline.batch.delay"=>50}
[2020-06-14T11:16:19,514][INFO ][logstash.pipeline        ] Pipeline started successfully {:pipeline_id=>"main", :thread=>"#<Thread:0x6dbc2611 run>"}
The stdin plugin is now waiting for input:
[2020-06-14T11:16:19,722][INFO ][logstash.agent           ] Pipelines running {:count=>1, :pipelines=>["main"]}
hello world
{
          "host" => "VM_16_5_centos",
    "@timestamp" => 2020-06-14T03:23:11.693Z,
      "@version" => "1",
       "message" => "hello world"
}
  • 配置一个简单的logstash, 输入是标准输入stdin, 输出是es
input { stdin { } }
output {
  elasticsearch { hosts => ["localhost:9200"] }
  stdout { codec => rubydebug }
}
bin/logstash -f logstash-simple.conf

When you run logstash, you use the -f to specify your config file. (用f参数来指定logstash的配置文件),接下来我们来测试一下:

hhhh
{
    "@timestamp" => 2020-06-14T04:29:44.247Z,
      "@version" => "1",
          "host" => "VM_IP_centos",
       "message" => "hello world sworldhhhh"
}
logstash test
{
    "@timestamp" => 2020-06-14T04:30:24.210Z,
      "@version" => "1",
          "host" => "VM_IP_centos",
       "message" => "logstash test"
}

我在命令行终端输入两次,一次“hello world sworldhhhh”, 一次“logstash test”

kibana的查询结果

A Logstash config file has a separate section for each type of plugin you want to add to the event processing pipeline. For example:

# This is a comment. You should use comments to describe
# parts of your configuration.
input {
  ...
}

filter {
  ...
}

output {
  ...
}
  • 接下来我们将读取从标准输入换成从文件读取

Logstash 使用一个名叫 FileWatch 的 Ruby Gem 库来监听文件变化。这个库支持 glob 展开文件路径,而且会记录一个叫 .sincedb 的数据库文件来跟踪被监听的日志文件的当前读取位置。所以,不要担心 logstash 会漏过你的数据。

input
    file {
        path => ["/var/log/*.log", "/var/log/message"]
        type => "system"
        start_position => "beginning"
    }
}

input负责从数据源提取数据,由于我提取的是日志文件,所以使用的是file插件,该插件常用的几个参数是:

path:指定日志文件路径。
type:指定一个自定义名称,设置type后,可以在后面的filter和output中对不同的type做不同的处理,适用于需要消费多个日志文件的场景。
start_position:指定起始读取位置,“beginning”表示第一次启动从文件头开始读取,后面动态读取;“end”表示从文件尾开始(类似tail -f)。
sincedb_path:sincedb_path 指定sincedb文件的路径。sincedb保存每个日志文件已经被读取到的位置,如果Logstash重启,对于同一个文件,会继续从上次记录的位置开始读取。如果想重新从头读取文件,需要删除sincedb文件。如果设置为“/dev/null”,即不保存位置信息。

Elk之Filebeat初探

  • 什么是Filebeat?

Filebeat是Beat成员之一,基于Go语言,无任何依赖,并且比logstash更加轻量,非常适合安装在生产机器上,不会带来过高的资源占用,轻量意味着简单,所以Filebeat主要作用是将收集的日志原样上报。

  • Filebeat的作用是?

Filebeat的作用主要是用于转发和汇总日志与文件

  • Filebeat的应用场景?

我们要查看应用的一些log, 比如nginx log, php error log, mysql 的一些log, 我们往往需要登录到服务器上(或者我们没有权限登录服务器),而是让运维把log传给我们,我们再去查看,如果服务器的数量比较少的话,还比较容易操作,但是如果服务器的数量成百上千的话,那这个拿日志的操作就比较繁琐了。如果我们使用Filebeat后,我们可以把filebeat部署到应用的每台机器上,它就可以帮我们收集服务器上的各种log, 然后在我们的可视化界面当中展示出来,这就是filebeat主要的作用

Filebeat内置了很多模块(auditd, Apache, nginx, system, mysql等等),可针对常见格式的日志大大简化收集、解析和可视化过程,只要一条命令即可。

Filebeat 不会导致管道过载,以下是官网的一段介绍:

当将数据发送到 Logstash 或 Elasticsearch 时,Filebeat 使用背压敏感协议,以应对更多的数据量。如果 Logstash 正在忙于处理数据,则会告诉 Filebeat 减慢读取速度。一旦拥堵得到解决,Filebeat 就会恢复到原来的步伐并继续传输数据。

Filebeat架构:

Here’s how Filebeat works: When you start Filebeat, it starts one or more inputs that look in the locations you’ve specified for log data. For each log that Filebeat locates, Filebeat starts a harvester(中文被翻成收割机). Each harvester reads a single log for new content and sends the new log data to libbeat, which aggregates the events and sends the aggregated data to the output that you’ve configured for Filebeat.

What is a harvester?

A harvester is responsible for reading the content of a single file. The harvester reads each file, line by line, and sends the content to the output. One harvester is started for each file. The harvester is responsible for opening and closing the file, which means that the file descriptor remains open while the harvester is running. If a file is removed or renamed while it’s being harvested, Filebeat continues to read the file. This has the side effect that the space on your disk is reserved until the harvester closes. By default, Filebeat keeps the file open until close_inactive is reached.

部署与运行?

下载: https://www.elastic.co/cn/downloads/past-releases#filebeat

cd /opt/
tar -xvzf filebeat-6.2.4-linux-x86_64.tar.gz

[root@VM_IP_centos opt]# cd filebeat-6.2.4/
[root@VM_IP_centos filebeat-6.2.4]# ls -lh
total 48M
-rw-r--r--  1 root root  44K Apr 13  2018 fields.yml
-rwxr-xr-x  1 root root  47M Apr 13  2018 filebeat
-rw-r-----  1 root root  51K Apr 13  2018 filebeat.reference.yml
-rw-------  1 root root 7.1K Apr 13  2018 filebeat.yml
drwxrwxr-x  4 www  www  4.0K Apr 13  2018 kibana
-rw-r--r--  1 root root  583 Apr 13  2018 LICENSE.txt
drwxr-xr-x 14 www  www  4.0K Apr 13  2018 module
drwxr-xr-x  2 root root 4.0K Apr 13  2018 modules.d
-rw-r--r--  1 root root 187K Apr 13  2018 NOTICE.txt
-rw-r--r--  1 root root  802 Apr 13  2018 README.md
  • 下面我们来配置下filebeat, 先让他从标准输入(键盘)接收数据
cp /opt/filebeat-6.2.4/filebeat.yml /opt/filebeat-6.2.4/test.yml
vim test.yml
filebeat.prospectors:
- type: stdin
  enabled: true
output.console:
  pretty: true
  enable: true

type: 指定输入类型,可以是stdin, 也可以是log(文件),可以指定多个input, enable表示是是否启用

output.console. 表示是否启用终端输出

  • 启动filebeat和测试效果
[root@VM_IP_centos filebeat-6.2.4]# ./filebeat -e -c test.yml 
2020-06-13T06:40:22.290+0800	INFO	instance/beat.go:468	Home path: [/opt/filebeat-6.2.4] Config path: [/opt/filebeat-6.2.4] Data path: [/opt/filebeat-6.2.4/data] Logs path: [/opt/filebeat-6.2.4/logs]
2020-06-13T06:40:22.290+0800	INFO	instance/beat.go:475	Beat UUID: d29dba4a-be63-483a-8d15-35d78f1fa68e
2020-06-13T06:40:22.290+0800	INFO	instance/beat.go:213	Setup Beat: filebeat; Version: 6.2.4
2020-06-13T06:40:22.290+0800	INFO	pipeline/module.go:76	Beat name: VM_16_5_centos
2020-06-13T06:40:22.290+0800	INFO	instance/beat.go:301	filebeat start running.
2020-06-13T06:40:22.290+0800	INFO	registrar/registrar.go:73	No registry file found under: /opt/filebeat-6.2.4/data/registry. Creating a new registry file.
2020-06-13T06:40:22.291+0800	INFO	[monitoring]	log/log.go:97	Starting metrics logging every 30s
2020-06-13T06:40:22.298+0800	INFO	registrar/registrar.go:110	Loading registrar data from /opt/filebeat-6.2.4/data/registry
2020-06-13T06:40:22.298+0800	INFO	registrar/registrar.go:121	States Loaded from registrar: 0
2020-06-13T06:40:22.298+0800	WARN	beater/filebeat.go:261	Filebeat is unable to load the Ingest Node pipelines for the configured modules because the Elasticsearch output is not configured/enabled. If you have already loaded the Ingest Node pipelines or are using Logstash pipelines, you can ignore this warning.
2020-06-13T06:40:22.298+0800	INFO	crawler/crawler.go:48	Loading Prospectors: 1
2020-06-13T06:40:22.298+0800	INFO	crawler/crawler.go:82	Loading and starting Prospectors completed. Enabled prospectors: 1
2020-06-13T06:40:22.298+0800	INFO	log/harvester.go:216	Harvester started for file: -

#Harvester started for file 表示filebeat已经启动 
hello #这里是我在命令行的一个输入
{
  "@timestamp": "2020-06-12T22:40:38.439Z",
  "@metadata": {
    "beat": "filebeat",
    "type": "doc",
    "version": "6.2.4"
  },
  "message": "hello",
  "prospector": {
    "type": "stdin"
  },
  "beat": {
    "name": "VM_IP_centos",
    "hostname": "VM_IP_centos",
    "version": "6.2.4"
  },
  "source": "",
  "offset": 6
}
#filebeat两个启动参数
-c, --c string             Configuration file, relative to path.config (default "filebeat.yml")
       --cpuprofile string    Write cpu profile to file
-e, --e                    Log to stderr and disable syslog/file output (输出到标准输出,默认输出到syslog和logs下)
-d, -d "publish" 输出debug信息
  • 读取文件
filebeat.prospectors:
- type: log
  enabled: true
  paths:
    - /tmp/logs/*.log
output.console:
  pretty: true
  enable: true
#启动
[root@VM_IP_centos filebeat-6.2.4]# ./filebeat -e -c test.yml 
2020-06-13T07:06:49.189+0800	INFO	instance/beat.go:468	Home path: [/opt/filebeat-6.2.4] Config path: [/opt/filebeat-6.2.4] Data path: [/opt/filebeat-6.2.4/data] Logs path: [/opt/filebeat-6.2.4/logs]
2020-06-13T07:06:49.189+0800	INFO	instance/beat.go:475	Beat UUID: d29dba4a-be63-483a-8d15-35d78f1fa68e
2020-06-13T07:06:49.189+0800	INFO	instance/beat.go:213	Setup Beat: filebeat; Version: 6.2.4
2020-06-13T07:06:49.190+0800	INFO	pipeline/module.go:76	Beat name: VM_16_5_centos
2020-06-13T07:06:49.190+0800	INFO	instance/beat.go:301	filebeat start running.
2020-06-13T07:06:49.190+0800	INFO	registrar/registrar.go:110	Loading registrar data from /opt/filebeat-6.2.4/data/registry
2020-06-13T07:06:49.190+0800	INFO	registrar/registrar.go:121	States Loaded from registrar: 0
2020-06-13T07:06:49.190+0800	WARN	beater/filebeat.go:261	Filebeat is unable to load the Ingest Node pipelines for the configured modules because the Elasticsearch output is not configured/enabled. If you have already loaded the Ingest Node pipelines or are using Logstash pipelines, you can ignore this warning.
2020-06-13T07:06:49.190+0800	INFO	crawler/crawler.go:48	Loading Prospectors: 1
2020-06-13T07:06:49.190+0800	INFO	log/prospector.go:111	Configured paths: [/tmp/logs/*.log]
2020-06-13T07:06:49.190+0800	INFO	crawler/crawler.go:82	Loading and starting Prospectors completed. Enabled prospectors: 1
2020-06-13T07:06:49.190+0800	INFO	[monitoring]	log/log.go:97	Starting metrics logging every 30s
2020-06-13T07:06:49.191+0800	INFO	log/harvester.go:216	Harvester started for file: /tmp/logs/a.log

#Harvester started for files: /tmp/logs/a.log 表示已经感知到我们设置的log文件
现在我们往a.log里写内容
[root@VM_IP_centos logs]# echo "hello" >> a.log

终端输出:
{
  "@timestamp": "2020-06-12T23:08:14.192Z",
  "@metadata": {
    "beat": "filebeat",
    "type": "doc",
    "version": "6.2.4"
  },
  "message": "hello",
  "prospector": {
    "type": "log"
  },
  "beat": {
    "name": "VM_IP_centos",
    "hostname": "VM_IP_centos",
    "version": "6.2.4"
  },
  "source": "/tmp/logs/a.log",
  "offset": 6
}
  • Filebeat 自定义tag:
filebeat.prospectors:
- type: log
  enabled: true
  paths:
    - /tmp/logs/*.log
  tags: "web"
output.console:
  pretty: true
  enable: true

echo "test2366666" >> a.log
{
  "@timestamp": "2020-06-12T23:35:31.364Z",
  "@metadata": {
    "beat": "filebeat",
    "type": "doc",
    "version": "6.2.4"
  },
  "source": "/tmp/logs/a.log",
  "offset": 40,
  "message": "test2366666",
  "tags": [
    "web"
  ],  #多一个tag字段,这样的话,可以用来给日志打标签
  "prospector": {
    "type": "log"
  },
  "beat": {
    "name": "VM_16_5_centos",
    "hostname": "VM_16_5_centos",
    "version": "6.2.4"
  }
}
  • 设置自定义字段
filebeat.prospectors:
- type: log
  enabled: true
  paths:
    - /tmp/logs/*.log
  tags: "web"
  fields:
    from: "mobile" #关键在这里
output.console:
  pretty: true
  enable: true
{
  "@timestamp": "2020-06-12T23:52:12.102Z",
  "@metadata": {
    "beat": "filebeat",
    "type": "doc",
    "version": "6.2.4"
  },
  "offset": 54,
  "message": "test777777777",
  "tags": [
    "web"
  ],
  "prospector": {
    "type": "log"
  },
  "fields": {
    "from": "mobile" #效果
  },
  "beat": {
    "version": "6.2.4",
    "name": "VM_16_5_centos",
    "hostname": "VM_16_5_centos"
  },
  "source": "/tmp/logs/a.log"
}
filebeat.prospectors:
- type: log
  enabled: true
  paths:
    - /tmp/logs/*.log
  tags: "web"
  fields:
    from: "mobile"
  fields_under_root: true #自定乐字段挂在根节点
output.console:
  pretty: true
  enable: true
{
  "@timestamp": "2020-06-12T23:54:04.997Z",
  "@metadata": {
    "beat": "filebeat",
    "type": "doc",
    "version": "6.2.4"
  },
  "message": "test888",
  "source": "/tmp/logs/a.log",
  "tags": [
    "web"
  ],
  "prospector": {
    "type": "log"
  },
  "from": "mobile", #效果
  "beat": {
    "name": "VM_16_5_centos",
    "hostname": "VM_16_5_centos",
    "version": "6.2.4"
  },
  "offset": 62
}
filebeat.prospectors:
- type: log
  enabled: true
  paths:
    - /tmp/logs/*.log
  tags: "web"
  fields:
    from: "mobile"
  fields_under_root: true
setup.template.setting:
  index.number_of_shards: 3 #索引的分片数
output.elasticsearch: #关键--输出到es
  hosts: ["es_ip:9200"]
  • 再次启动filebeat
[root@VM_IP_centos filebeat-6.2.4]# ./filebeat -e -c test.yml 
2020-06-13T08:10:11.886+0800	INFO	instance/beat.go:468	Home path: [/opt/filebeat-6.2.4] Config path: [/opt/filebeat-6.2.4] Data path: [/opt/filebeat-6.2.4/data] Logs path: [/opt/filebeat-6.2.4/logs]
2020-06-13T08:10:11.889+0800	INFO	instance/beat.go:475	Beat UUID: d29dba4a-be63-483a-8d15-35d78f1fa68e
2020-06-13T08:10:11.889+0800	INFO	instance/beat.go:213	Setup Beat: filebeat; Version: 6.2.4
2020-06-13T08:10:11.889+0800	INFO	elasticsearch/client.go:145	Elasticsearch url: http://es_ip:9200 #这里表示已经设置写入es成功
2020-06-13T08:10:11.890+0800	INFO	pipeline/module.go:76	Beat name: VM_16_5_centos
2020-06-13T08:10:11.904+0800	INFO	instance/beat.go:301	filebeat start running.
2020-06-13T08:10:11.904+0800	INFO	registrar/registrar.go:110	Loading registrar data from /opt/filebeat-6.2.4/data/registry
2020-06-13T08:10:11.905+0800	INFO	registrar/registrar.go:121	States Loaded from registrar: 1
2020-06-13T08:10:11.905+0800	INFO	crawler/crawler.go:48	Loading Prospectors: 1
2020-06-13T08:10:11.905+0800	INFO	[monitoring]	log/log.go:97	Starting metrics logging every 30s
2020-06-13T08:10:11.911+0800	INFO	log/prospector.go:111	Configured paths: [/tmp/logs/*.log]
2020-06-13T08:10:11.911+0800	INFO	crawler/crawler.go:82	Loading and starting Prospectors completed. Enabled prospectors:
  • 我们来接着写一条:
[root@VM_IP_centos logs]# echo "test9999" >> a.log
  • 我们可以通过kibana来查看
kibana展示结果
  • 最后我们来说说Filebeat的工作原理:

Filebeat由两个主要组件组成:prospector(探测器)和havester(收割机)

  • prospector:

1.prospector负责管理havester并找到所有要读取的文件来源
2.如果输入类型为日志,则查找器将查找路径匹配的所有文件,并为每个文件启支一个harvestor
3.filebeat目前支持两种prospector类型:log和stdin

  • havester: (文章前面我们有介绍,可以看下上面的内容)

1.负责读取单个文件内容
2.如果文件在读取时被删除或重命名,filebeat将继续读取文件

  • Filebeat如何保持文件的状态(从哪行日志开始读)

1.Filebeat保存每个文件的状态并经常将状态刷新到磁盘上的注册文件中
2.该状态用于记住havester正在读取的最后偏移量,并确保发送所有日志行
3.如果输出无法访问,filebeat会跟踪最后发送的行,并在输出再次可用时继续读取文件
4.在Filebeat运行时,每个prospector内存中也会保存的文件状态信息,当重新启动filebeat时,将使用注册文件的数据来重建文件状态,filebeat将每个havestor在从保存的最后偏移量继续读取

文件的状态保存在哪呢?

/opt/filebeat-6.2.4/data #filebeat的data目录下
vim registry
[{"source":"/tmp/logs/a.log","offset":80,"timestamp":"2020-06-13T08:18:13.030292935+08:00","ttl":-1,"type":"log","FileStateOS":{"inode":894391,"device":64769}}

#offset表示偏移量
  • Module的使用,这部分暂时略,后续再写一篇相关的文章

ES(elasticsearch)学习笔记–安装

  • 概念:学任何东西之前,先了解下它是什么,它能做什么?

维基百科上的解释:Elasticsearch是一个基于Lucene库的搜索引擎。它提供了一个分布式、支持多租户的全文搜索引擎,具有HTTP Web接口和无模式JSON文档。Elasticsearch是用Java开发的,并在Apache许可证下作为开源软件发布。官方客户端在Java、.NET(C#)、PHP、Python、Apache Groovy、Ruby和许多其他语言中都是可用的。根据DB-Engines的排名显示,Elasticsearch是最受欢迎的企业搜索引擎,其次是Apache Solr,也是基于Lucene,主要作用:它可以快速地储存、搜索和分析海量数据。维基百科、Stack Overflow、Github 都采用它,还可以存储一些日志,比如binlog, accesslog, 监控日志等,便于快速检索和定位问题

  • 目前最新版本是哪个版本?

目前版本是:7.7.1 (2020-06-09),下载地址: https://www.elastic.co/cn/downloads/elasticsearch

  • 历史版本下载:

https://www.elastic.co/cn/downloads/past-releases#elasticsearch

  • 我选择的版本

这里选择的是elasticsearch-6.2.4,原因是我看的教程目前是这个版本的,下次有时间会找个最新版的来写篇教程。学习东西都差不多,触类旁通

  • 安装步骤

Elastic 需要 Java 8 环境。如果你的机器还没安装 Java,请选安装java,linux 下java安装很简单,注意要保证环境变量JAVA_HOME正确设置,设置java home的方法如下:

//假设java安装目录在/usr/java
JAVA_HOME=/usr/java/jdk
JRE_HOME=/usr/java/jdk/jre
CLASS_PATH=.:$JAVA_HOME/lib/dt.jar:$JAVA_HOME/lib/tools.jar:$JRE_HOME/lib
PATH=$PATH:$JAVA_HOME/bin:$JRE_HOME/bin
OPENSSL_CONF=/etc/pki/tls/openssl.cnf
export JAVA_HOME JRE_HOME CLASS_PATH PATH

//以上配置可以写在/etc/profile,或是~/.bashrc中
生效可以使用source /etc/profile, 或是source ~/.bashrc
$ wget https://artifacts.elastic.co/downloads/elasticsearch/elasticsearch-6.2.4.zip
$ unzip elasticsearch-6.2.4.zip
$ cd elasticsearch-6.2.4/ 
  • 启动elasticsearch,假设我的解压目录在/opt下
/opt/elasticsearch-6.2.4/bin/elasticsearch
  • 排坑指南

(1) can not run elasticsearch as root

这个问题的关键是elasticsearch为了安全不允许以root身份运行

#建立单独的用户组和用户
groupadd esgroup
useradd esuser -g esgroup -p 123456
chown -R esuser:esgroup /opt/elasticsearch-6.2.4

(2) ERROR: [2] bootstrap checks failed
[1]: max number of threads [3881] for user [esuser] is too low, increase to at least [4096]
[2]: max virtual memory areas vm.max_map_count [65530] is too low, increase to at least [262144]

#解决方案
vim /etc/security/limits.d/20-nproc.conf
*          soft    nproc     4096
*          hard    nproc     4096
//或者将*号改成esuser
//是否生效与否,可以切esuser,然后ulimit -a查看"max user processes"是否达到4096

在/etc/sysctl.conf添加vm.max_map_count
echo "vm.max_map_count=262144" > /etc/sysctl.conf
sysctl -p
  • 排完坑之后,/opt/elasticsearch-6.2.4/bin/elasticsearch
启动成功
  • 验证
[root@VM_IP_centos bin]# curl IP:9200
{
  "name" : "HnNnFni",
  "cluster_name" : "elasticsearch",
  "cluster_uuid" : "p96Hsjp8ROylQSq-AI32Jg",
  "version" : {
    "number" : "6.2.4",
    "build_hash" : "ccec39f",
    "build_date" : "2018-04-12T20:37:28.497551Z",
    "build_snapshot" : false,
    "lucene_version" : "7.2.1",
    "minimum_wire_compatibility_version" : "5.6.0",
    "minimum_index_compatibility_version" : "5.0.0"
  },
  "tagline" : "You Know, for Search"
}
  • Elasticsearch network.host 设置外网访问es
cd /opt/elasticsearch-6.2.4/config/
vim elasticsearch.yml

network.host: xx.xx.xx.xx(自己的ip)
#
# Set a custom port for HTTP:
#
http.port: 9200
  • 防火墙安全策略设置9200端口可访问
验证外网访问是否ok

接着我们安装kibana,先了解下kibana是什么?

Kibana是一个开源的分析和可视化平台,设计用于和Elasticsearch一起工作。可以用Kibana来搜索,查看,并和存储在Elasticsearch索引中的数据进行交互。执行高级数据分析,并且以各种图标、表格和地图的形式可视化数据。Kibana使得理解大量数据变得很容易。它简单的、基于浏览器的界面使你能够快速创建和共享动态仪表板,实时显示Elasticsearch查询的变化。

  • 具体安装

下载kibana: https://www.elastic.co/cn/downloads/past-releases#kibana,选择kibana-6.2.4,与es版本保持一致

#假设kibana-6.2.4-linux-x86_64.tar.gz在/opt下
cd /opt
tar -xvzf kibana-6.2.4-linux-x86_64.tar.gz
mkdir -p /usr/local/kibana
mv /opt/kibana-6.2.4-linux-x86_64/* /usr/local/kibana/
  • 修改kibana配置
cd /usr/local/kibana/config/
vim kibana.yml

//修改以下两个选项
server.host: "IP"
elasticsearch.url: "http://IP:9200/"  #es的ip
  • kibana启动,启动前,先放开防火墙的5601端口访问限制
/usr/local/kibana/bin/kibana
Kibana启动

出现Ready,说明启动成功

  • kibana验证
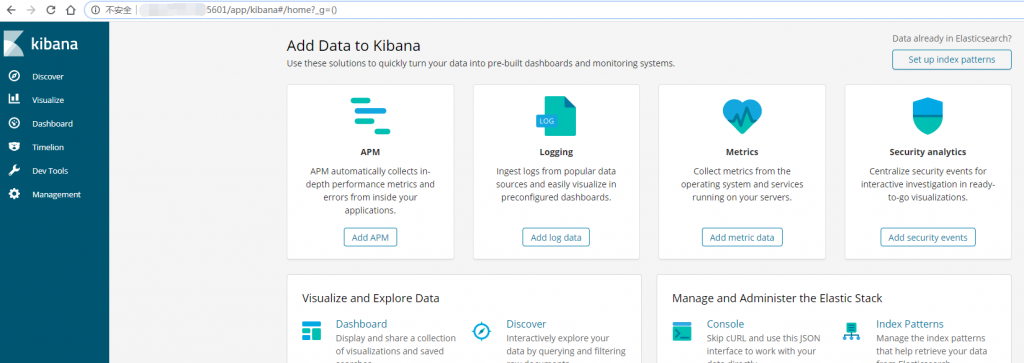
Kibana UI界面

Docker 读书笔记(三)

  • 虚拟机与linux容器的区别

linux 容器不是模拟一个完整的操作系统,而是对进程进行隔离。有了容器,就可以将软件运行所需的所有资源打包到一个隔离的容器中。容器与虚拟机不同,不需捆绑一整套操作系统,只需要软件工作需的库资源和设置。系统因此变得更高效更轻量并保证部署在任何环境中的软件都能始终如一地运行。docker 启动快,秒级的

虚拟机是带环境安装的一种解决方案(连硬件也模拟),它可以在一种操作系统里运行另一种操作系统,比如windows下运行linux系统。而对底层系统来说,虚拟机就是一个普通文件,不需要就删掉。虚拟机启动慢,分钟级的,虚拟机缺点:占用资源多,冗余步骤多,启动慢

传统虚拟机技术是虚拟出一套硬件后,在其上运行一个完整操作系统,在该系统上再运行所需应用进程;
而容器内的应用进程直接运行于宿主的内核,容器内没有自己的内核,而且也没有进行硬件虚拟。因此容器要比传统虚拟机更为轻便
每个容器之间互相隔离,每个容器有自己的文件系统,容器之间进程不会相互影响,能区分计算资源,耦合度低。

Docker带来的好处:DevOps开发自运维,一次构建,随处运行。更快速的应用交付和部署;更便捷的升级和扩缩容;更简单的系统运维;更高效的计算资源利用;

Docker 安装前提:

CentOS:CentOS6.5 64-bit 或更高的版本,内核版本:2.6.32-431或更高版本

//查看CentOS系统版本
[root@VM_IP_centos ~]# cat /etc/redhat-release 
CentOS Linux release 7.6.1810 (Core)

//查看内核
[root@VM_IP_centos ~]# uname -r
3.10.0-957.21.2.el7.x86_64
Docker三要素
  • hello world 实例
docker run hello-world

//先本机去找hello-world镜像,用这个镜像生成一个容器。如果本地没有,从远程仓库拉取,下载到本地,然后以镜像为模板生产容器实例运行

docker run 的过程:

首先系统要有一个docker daemon的后台进程在运行,当刚才这行命令敲下时,发生了如下动作:

  1. docker client(即:docker终端命令行)会调用docker daemon请求启动一个容器,
  2. docker daemon会向host os(即:linux)请求创建容器
  3. linux会创建一个空的容器(可以简单理解为:一个未安装操作系统的裸机,只有虚拟出来的CPU、内存等硬件资源)
  4. docker daemon请检查本机是否存在docker镜像文件,如果有,则加载到容器中
  5. 将镜像文件加载到容器中
  6. 如果在第4步检查本机镜像文件时,发现文件不存在,则会到默认的docker镜像注册机构(即:docker hub网站或是指定的仓库)去联网下载,下载回来后,再进行装载到容器的动作
此图像的alt属性为空;文件名为image-8.png
  • Docker 为什么比虚拟机快

1.docker 有着比虚拟机更少的抽象层。docker 不需要实现Hypervisor硬件资源虚拟化,docker 容器上的程序直接使用都是实际物理机上的硬件资源
2.docker 利用宿主机的内核,而不需要guest os, docker 不需要和虚拟机一样重新加载一个操作系统内核,避免引导,加载操作系统内核比较费时资源的过程。而docker 直接利用 宿主机的操作系统,所以新建docker 比较快

  • 容器虚拟化技术与虚拟机有什么不同?
Docker容器虚拟机VM
操作系统与宿主机共享OS宿主机OS上运行虚拟机OS
存储大小镜像小,便于存储与传输镜像庞大(vmdk,vdi等)
运行性能几乎无额外性能损失操作系统额外的CPU,内存消耗
移植性轻便、灵活、适应于linux笨重,与虚拟化技术耦合度高
硬件亲和性面向软件开发者面向硬件运维者
部署速度快速,秒级较慢,10s以上
  • Docker 命令总结
帮助与镜像命令
容器命令1
容器命令2
容器命令3
容器命令4
  • Docker 命令小结
小结
  • UnionFS(联合文件系统):Union文件系统是一种分层,轻量级并且高性能的文件系统,它支持对文件系统的修改作为一次提交来一层层的叠加,同时可以将不同目录挂载到同一个虚拟文件系统下(unite serveral directories into a single virtual filesystem)。Union文件系统是Docker 镜像的基础。镜像可以通过分层来进行继承,基于基础镜像(没有父镜像),可以制作出具体的应用镜像
  • Docker镜像加载原理:

docker 的镜像实际上由一层一层的文件系统组成,这种层级的文件系统UnionFS。bootfs 主要包含bootloader和kernel,bootloader主要引导加载kernel,Linux刚启动时会加载bootfs文件系统,在Docker镜像的最底层是bootfs。这一层与我们典型的Linux/Unix系统是一样的,包含boot加载器和内核。当boot加载完,整个内核就在内存中了,此时内存使用权已由bootfs转交给内核,此时系统也会卸载bootfs。

rootfs,在bootfs之上,包含的就是典型的linux系统中的/dev, /proc, /bin, /etc等标准目录和文件。rootfs就是各种不同的操作系统发行版,比如ubuntu和centos等。

Mysql 复制(Replication)

复制(replication)功能可以将一个MySQL数据库服务器(主库)中的数据复制到一个或多个 MySQL 数据库服务器(从库)。默认情况下,复制是异步的;从库不需要永久连接以接收来自主库的更新。你可以将其配置为复制所有数据库、复制指定的数据库,甚至还可以配置为复制数据库中指定的表。

异步复制,同步复制,半同步复制的区别:

异步复制:MySQL默认的复制即是异步的,主库在执行完客户端提交的事务后会立即将结果返给给客户端,并不关心从库是否已经接收并处理,这样就会有一个问题,主如果crash掉了,此时主上已经提交的事务可能并没有传到从库上,如果此时,强行将从提升为主,可能导致新主上的数据不完整, 主库将事务 Binlog 事件写入到 Binlog 文件中,此时主库只会通知一下 Dump 线程发送这些新的 Binlog,然后主库就会继续处理提交操作,而此时不会保证这些 Binlog 传到任何一个从库节点上
全同步复制: 指当主库执行完一个事务,所有的从库都执行了该事务才返回给客户端。因为需要等待所有从库执行完该事务才能返回,所以全同步复制的性能必然会收到严重的影响
半同步复制: 是介于全同步复制与全异步复制之间的一种,主库只需要等待至少一个从库节点收到并且 Flush Binlog 到 Relay Log 文件即可,主库不需要等待所有从库给主库反馈。同时,这里只是一个收到的反馈,而不是已经完全完成并且提交的反馈,如此,节省了很多时间

复制原理:

在服务器(主库)上执行的所有DDL和DML语句都会被记录到二进制日志中,这些日志由连接到它的服务器(称为从库)提取。它们只是被复制到从库,并被保存为中继日志。这个过程由一个称为 IO 线程的线程负责。还有一个线程叫作SQL线程,它按顺序执行中继日志中的语句。

IO线程:负责提取binlog复制到从库,保存存中继日志(relay log)
SQL线程:顺序执行relay log 中的语句,重放到从库

原理总结:

1.Master 数据库只要发生变化,立马记录到Binary log 日志文件中
2.Slave数据库启动一个I/O thread连接Master数据库,请求Master变化的二进制日志
3.Slave I/O获取到的二进制日志,保存到自己的Relay log 日志文件中。
4.Slave 有一个 SQL thread定时检查Realy log是否变化,变化那么就更新数据

PS:

DML(data manipulation language)
主要是指select , update, insert, delete,就像它的名字一样,这四条命令是用来对数据库里的数据进行操作的语言.

DDL (data definition language)
DDL主要的命令有create, alter, drop等,ddl主要是用在定义或改变表结构、数据类型,表之间的链接和约束等初始化工作.
DCL (Data Control Language)
数据库控制功能,用来设置更改数据库用户或角色权限的语句,包括:grant, deny, revoke等

复制(主从)有哪些优点:

  • 水平解决方案:将负载分散多个从库以提高性能.比如读写分离,在此环境中,所有的写入和更新必须在主库上执行.但是读可能发生在一个或多个从库上.这样做可以提高写入性能,同时对不断增加的从库也能显著加快其读取速度
  • 数据安全性:可以在从库上运行备份服务而不会损坏主库的数据
  • 远程数据分发:可以使用复制为远程服务器站点创建本地数据的副本,无须永久访问主库

复制常见的拓扑形式:

传统复制–主从复制(一主多从)

链式复制:意味着一台服务器从另一台复制,而另一台服务器又从另一台复制.中间的服务器称为中继主库(主库->中继主库->从库),如下图所示:

链式复制

如果想要在两个数据中心之间复制,一般就会使用这种方式.主库(the primary master)及其从库将位于一个数据中心内。辅助主库(中继主库)从另一个数据中心的主库进行复制。另一个数据中心的所有从库都从辅助主库(the secondary master)复制。

主主复制:两个主库互相之间都可以接受写入和复制

主主复制

多源复制:一个从库将从多个主库复制

多源复制

如何设置从库:

1.在主库上启用二进制日志记录。
2.在主库上创建一个复制用户。
3.在从库上设置唯一的server_id。
4.从主库中取得备份。
5.恢复从库上的备份。
6.执行CHANGE MASTER TO命令。
7.开始复制。

具体步骤:

  • 在主库上,启用二进制日志记录并设置server id.
//更改主库my.cnf
server-id=1
binlog-format = mixed
log-bin=mysql-bin
datadir=/var/lib/mysql
innodb_flush_log_at_trx_commit=1
sync_binlog=1
  • 在主库上,创建一个复制用户,从库使用此账号连接到主库:
GRANT REPLICATION SLAVE ON *.* TO replicant@% IDENTIFIED BY '<<choose-a-good-password>>'
  • 在从库上,设置唯一的server_id选项,这个id与你在主库上的不同
mysql>set @@GLOBAL.SERVER_ID = 2;
  • 使用binlog位置创建备份文件,它会影响数据库的性能,但是不会锁表
mysqldump --skip-lock-tables --single-transaction --flush-logs --master-data --databases test01 > ~/dump.sql

//--master-data选项的作用就是将二进制的信息写入到输出文件中,在这里是写入到备份的sql文件中
//--master-data可以了解还原的到从库的备份文件,position和log_file在哪,这样应该就可以不用停机设置主从同步了
  • 检查文件头部并记下MASTER_LOG_FILE和MASTER_LOG_POS的值
head dump.sql -n80 | grep "MASTER_LOG_POS"
  • 修改从库my.cnf
server-id = 2
binlog-format = mixed
log_bin = mysql-bin
relay-log = mysql-relay-bin
log-slave-updates = 1
read-only = 1
  • 导入sql 备份到从库
mysql -u root -p < ~/dump.sql
  • 从库设置主库同步位置信息:
CHANGE MASTER TO MASTER_HOST='192.168.0.20',MASTER_PORT=5306,MASTER_USER='slave',MASTER_PASSWORD='VsaN4Z8mtE', MASTER_LOG_FILE='slave-bin.000034',MASTER_LOG_POS=271;
  • start slave
  • show slave status

如果一切正常,则Last_Error将为空,Slave_IO_State将报告等待主发送事件。

show slave status

复制延迟可以查看Seconds_Behind_Master的值,它代表的是复制的延迟情况。如果它的值为0,则意味着从库与主库同步;如果为非零值,则表示延迟的秒数;如果为NULL,则表示未复制

PS: 主库my.cnf配置文件中还有一些参数可以了解,设置同步的db和不同步的db

replicate-do-db = exampledb //需要同步的数据库
replicate-ignore-db = mysql //不需要同步的数据库
replicate-ignore-db = information_schema //不需要同步的数据库
replicate-ignore-db = performance_schema //不需要同步的数据库